Showing posts with label Buttons Galore & More. Show all posts

Monday, June 2, 2014

Make 5 Great Dolly And Me Matching Pendants With This Great Kit From Buttons Galore & More!

Many of you know I have my niece Thea on Thursdays and she and I get a girly tea party and craft day! Well this past Thursday we made these amazingly easy and fun pendants from a great kit I got from Buttons Galore & More.
To make your own pendants for yourself and your dolls you will need:
- A Kids Pendant Kit From Buttons Galore & More (click here for website and product listing)
-Aleenes Pendant Glue From ilovetocreate.com (click here for website and product listing)
-tweezers
Open the kit and choose from the great selection of buttons and gem stones to create just the right look for your pendant. Then using your Aleenes's Pendant Glue layer your button on top of the pendant bails, press your button into place and add a bit more glue, use your tweezers and select one of the gemstones and place it in the center or where ever you would like the gems. 
Let it dry and then place on your faux leather cords. 
For the dolls and the Bitty's I doubled the faux leather cords to make them dolly length. 
This was a quick and easy craft for Thea and I to do and she was so proud with the results and we can not wait to try making more for gifts for her sister and cousins.
Click here to see more of the wonderful crafts kits on Buttons Galore and More! 
As with all my posts we would love to hear from you so please leave us a comment here or email us at karenmowen@gmail.com

Friday, May 30, 2014

A Quick Home Spa Visit! An Our Generation Doll Rescue and Repair


The other night one of my son's young friends called to ask if I could give her doll a make over. I was delighted! Her doll is an older Our Generation doll who has been very loved. I knew this hair make over needed the Heads Up Detangler from TwinPinesofMaine I use this product now daily on my dolls and love the results.
 I used the detangler straight letting it soak into the dolls very dry split hair and I also used it in a spray bottle. I used the wire wig brush from American Girl, and started by combing the ends and working my way to the top. *When you have an OG doll or a Springfield Doll a wire wig brush is not the best idea, if you can get a plastic brush your dolls hair will be less likely to split. But this head needed the strength of the wire brush.
After her hair, I used the Formula 911 also from Twin Pines Of Maine, on her face, ears, arms and legs.
That helped remove the ink and surface dirt from her vinyl and it worked like a charm!
This doll originally had her hair up so I decided to style her hair and make a bow.
This is where a well stocked craft box comes in handy! I grabbed my ribbon, buttons from Buttons Galore and More, as well as a gem stone and my Aleene's Glue from ilovetocreate.com and in less then two minutes I made this fun and easy hair bow to match the dolls eyes and summer dress!
I then repeated the button pattern on the summer dress as embellishment. I was even able to deliver the doll back to her owner in time for a quick play before bed time. I was thrilled with how this make over turned out and honored to be asked to help with it.
You can check out my Instagram account by clicking here to see what daily dolly things I get up to, and I would love to follow you! So please visit me and follow along.
 As with all my posts I would love to hear from you so please leave me a comment here or email me at karenmowen@gmail.com
Thursday, May 15, 2014

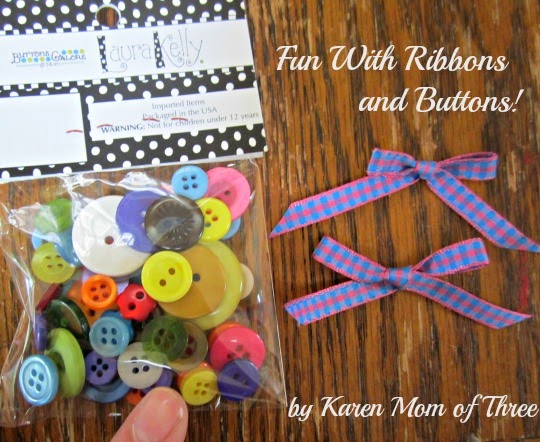
Bitty Twin Fun With Buttons Galore And More Laura Kelly Buttons!


My Niece Thea is over today and she wanted to make some thing with buttons and bows for her self and for our bitty twin Cheryl. 
So I got out our ribbon and button stash. We love Buttons Galore & More Laura Kelly buttons for crafting! 
We first chose a ribbon that Thea liked and created our bows we tied three matching bows. Next we selected two of the dolly hair bands we got from our dollar store and  Thea wanted hers on a bobby pin so we selected the one she liked best from my stash, it's a sparkle one.
We used our Aleene's Tacky Glue from I love to Create and selected light blue and red buttons from our multi pack we glued them together and thought they needed some sparkle so we added some small gem stones. We let them dry and then glued the ribbon to our dolly hair bands and slid the bobby pin arm through the button back and added more tacky glue. After they dried Thea let me put them in Cheryl's Hair and her bobby pin into her pony tail!
This was a fun and easy craft to do with my niece Thea who turns 4 next week!
Off to lunch now and Tea with Thea!
As with all our posts we would love to hear from you so please leave me a comment here or email me at karenmowen@gmail.com

Wednesday, January 8, 2014

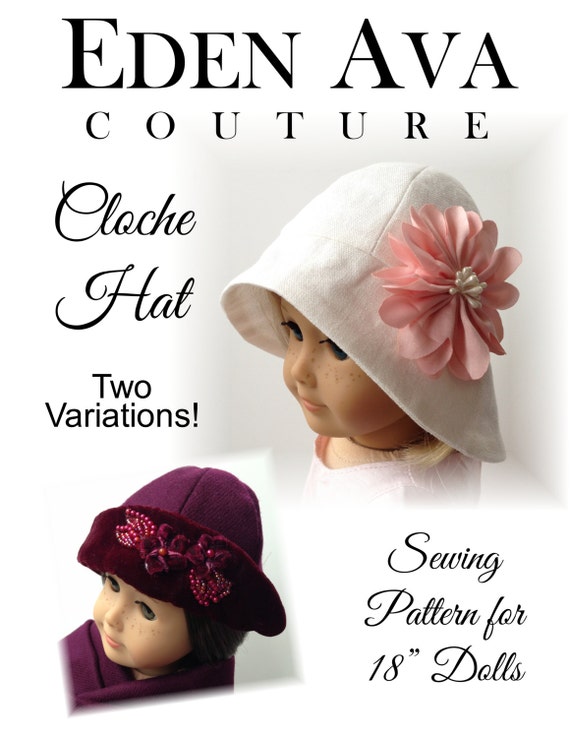
How To Make A Beautiful Doll More Beautiful...Sew A Cloche Hat or two...Pattern Reveiw

So today is a rainy rainy day and I set out this morning with my tea and planners to sew today. 
 
Little did I know at 6:30 am that the Cloche Pattern Hat from Eden Ava would be so very easy and profoundly change my thoughts on sewing hats for 18 inch dolls.
As many of you know I work with a bunch of wonderful ladies who belong to Dolls for A Cause , our February cause is Leukemia support and research. Our color scheme is going to be purple so I set out to make my hat to donate to the Auction. I am so very thrilled with how it turned out.  
I want to thank Eden Ava Couture for donating the pattern to be used to make this hat for the auction.
I would also like to thank Coats & Clark for donating the awesome thread I used
I would also like to thank Buttons Galore & More and Laura Kelly Designs for the buttons I used to embellish the hats
The Cloche Hat Pattern from Eden Ava Couture earns the Karen Mom of Three Stamp of Approval. I was able to complete 2 hats in under 1 hour from start to finish and I am thrilled with how easily they came together. If you are looking for a fun hat pattern start with this one.

Click here for Eden Ava Couture's Etsy shop.
As with all my posts I would love to hear from you so please leave me a comment here or email me at karenmowen@gmail.com
Today I used my American Girl Doll Chrissa and My Dolls House Doll from the UK named Ruby.

Tuesday, December 24, 2013

It's Christmas Eve! My Third Blog Aniversary!


How the time does fly! It is Christmas Eve. How does this happen? Every year it seems we plan and anticipate, scheme and prepare and yet it sneaks up on us year after year. This is such a special time for me, for my family and my blog and I thank each and everyone of you who has followed along this season, read my blog, stumbled on to us on Facebook, Pinterest or Blogger.


Not only is it Christmas Eve but it is also my blog's Third Anniversary. I began this blog Three years ago on a whim. I started this blog at the suggestion of strangers, who would later become treasured friends, that I had met through FB about sharing my doll sewing and craft adventures. I honestly never thought anyone would read it outside my own family. I could never have imagined the way this blog would change my life.


Three years ago a life I could not have imagined for myself began to unfold and each and everyone of you is a part of that journey. I want to thank you for stopping by, for what ever lead you here. Your words, comments and emails have been so encouraging, thoughtful and kind.  It is for each one of you who took the time to let me know you were out there reading and enjoying my work that I continue to write, create and share.


A Special Thank you to Brandy, Madelon, Jessica T for the ideas, crafts and fun finds you have shared with me so that I can share with our readers.  Thank you to Deena of Deena and Beena You tube and Lauren M for your wonderful Dolly Friendship.  Thank you also to Kathryn at Daydream Doll Boutique for giving me another place to share my doll play ideas and crafts.


A Very Special thank you  to Char at Doll Diaries, Anna at Doll it Up and Laura Kelly of Laura Kelly Designs who have included me on the most fantastic and creative teams I could have every dreamed of belonging too.


Thank you to all the wonderful Etsy Shops who have let us have a behind the scenes look at their passion and their work, the pattern designers who give me sneak peeks so that I may share my true opinions of their work with all of you. Thank you to Springfield Collection and Fiber Craft for creating a line of amazing dolls and products that truly helps put doll play in the hands of those who could not previously attain  quality doll play items. Thank you to Canada's Maplelea for including us this year their in their 10 year anniversary and sending me their Set To Celebrate Party Set! 


I would also like to thank the companies of Sculpey Clay, Buttons Galore & More, Rit Dye and Rit StudioCoats & Clark, Red Heart Yarns, Plaid and Folk Art and Laura Kelly Designs for allowing me to share their amazing products with you and helping me to create wonderful doll play items for you, my nieces, my doll swap partners and my family. 
Today I am so very thankful for all of you and hope you will join us for more doll play in the coming days and new year.
If Christmas is a holiday you and your family celebrate then I wish you a Very Merry Christmas and look forward to sharing more with you soon!
As with all my posts I would love to hear from you so please leave me a comment here or email me at karenmowen@gmail.com

Tuesday, December 17, 2013

Embelish Felt Pillow's For Your Dolls This Holiday! A Tutorial by Karen Mom of Three

Today I wanted to share with you the little pillows I made using Coats & Clark Embroidery Thread, Buttons from Button's Galore & More and Felt from Darice  . This is a fun and easy way to practice your stitches and create adorable pillows for your dolls or add a ribbon and make them into tree ornaments.

To create your own little Embellished Felt Pillows You will need:
-Embroidery thread, I used Coats & Clark Embroidery Thread
-Felt Scraps from Darice
-Buttons from Buttons Galore & More
-An Embroidery Needle
-Scissors
-Fiber Fill
Step 1- select your felt pieces to embroider. I grabbed scrap felt from my bag of scraps from Darice
Step 2- Thread your embroidery needle knot the end of one of your strands of thread. Decide the word you would like to sew, I chose "Joy" as it was easy to sew, then "Love" and Peace". If you are unsure where to sew, use a pencil and sketch it on your felt.
Step 3- Knot the last stitch on the back side of your felt. Then repeat on as many felt squares as you wish.
Step 4-Embelish your pillow front with buttons. I used one
Step 5- Select a backing felt for your pillow, I used a piece that was slightly bigger for the back and centered the embroidered piece. I stitched it into place leaving one end open for stuffing, then stuffed the pillow and sewed the end closed and knotted the final stitch on the back side of the pillow. 

If you want to make these as hanging pillow ornaments you can sew on a ribbon to the back of the pillow or keep as holiday throw pillows for your dolls.
Thank you to Coats and Clark, Buttons Galore & More, and Darice for such wonderful products to work with! You can visit any of their sites by clicking on their names or highlighted words in today's post. Be sure to check my Doll Diaries Post out this Friday for the how to on my Coats and Clark Doll Hairband using Phoomph for Fabric! Ruthie loves her new hairband and so do I!
As with all my posts I would love to hear from you so please leave me a comment here or email me at karenmowen@gmail.com

Wednesday, December 11, 2013

Tandem Dye A Diaper Shirt For Your Bitty Baby A Rit Dye Tutorial By Karen Mom of Three

Forgive the shiny light reflection in the photos from today's post. As I was photographing this last night I ran out of light but could not wait to share with you my tutorial for a tandem dye diaper shirt. 
To dye and create a holiday diaper shirt your own Bitty Baby Diaper shirt you will need:
-A 5lb Baby Diaper Shirt I got mine at Sears
-Two Jars
-4 to 6 Cups of Hot Water
-1/2 cup of salt
-A squeeze of liquid dish soap for each jar
-A Plastic Craft Spoon
-Gloves
-Sink to rinse your diaper shirt
-A timer
-A dryer
-A Fabric Remnant Shape (I used a Cupcake)
-Needle and Thread
I called this Tandem Dyeing as I am an impatient crafter and I wanted to have this done before dinner. I started by adding 4 cups of hot water to my large jar and 2 cups to my smaller jar, I added salt, and liquid dye to each jar, I also added a quick squirt of liquid dish soap and stirred the jars separately. I wet the diaper shirt under the tap and then placed the top of the shirt in one jar and the bottom half in the other. I used the spoon to make sure that the shirt was submerged. I left the middle to be plain.
I set my timer for 1 hour and went to work on the embellishment. I used Phoomph for fabric from Coats and Clark, I love this product. It helps give a 3D look to my crafts. I cut out a rough shape of my cupcake from my remnant fabric and then a similar shape from the sheet of Phoomph. I peeled back the backing on one side and lay my fabric on the Phoomph. I then cut out the cupcake shape and the bonus cookie and heart shape too!

I then  found some of my favorite little Laura Kelly buttons and layered them on the Phoomph. Once I had an idea of where I wanted the heart and the cookie shape to go on my cupcake, I thread the needle and sewed the buttons to the heart and then the hear to the cupcake wrapper. I added the star cookie as well.

When the timer went I rinsed the diaper shirt and set it in the dryer. Once dry I attached Cupcake to the diaper shirt. I peeled the back from the other side of the cupcake Phoomph and pressed it into place. I then used my needle and thread and sewed the cupcake into place.
Now our Bitty Baby has a new Holiday Diaper Shirt for when my niece Thea comes to tea on Thursday! I love working with Rit Dye!
I hope you enjoyed today's Tutorial and I look forward to sharing more doll crafts, ideas and fun finds with you soon!
As with all my posts I would love to hear from you so please leave me a comment here or email me at karenmowen@gmail.com

Monday, December 9, 2013

My Peppermint Snow Outfit Review! Eden Ava Creates Amazing Patterns!

Every now and then the perfect pattern comes along and even more infrequent is the perfect material presents it's self at the right time. For the second year in a row my most favorite pattern of the Holiday Season is from Eden Ava Couture. I was able to make the entire pattern (minus the tights, I forgot to buy elastic at the store yesterday) in under 90 minutes.
I went to my local fabric store and tried to find the right fabric to create this sophisticated holiday outfit that is now going to be a timeless classic in my collection. I found the remnant to create the dress for $5 and I can make at least 4 more dresses with that $5 fabric. Everything else I had on hand including the Buttons Galore & More Snowflake Button from the Snowflake Value Pack.

Eden Ava Couture is now offering their patterns exclusively on Eden Ava Couture's Etsy Shop , the Peppermint Snow Outfit gets the Karen Mom of Three Stamp of Approval! 
Check Out Eden Ava Couture by clicking on any of the highlighted words in this post and be sure to pick up some wonderful holiday buttons from Buttons Galore & More by clicking here.
Sew someone you love an outfit this holiday season, if I can do it in 90 minutes with a sick child at home anyone can!  This easy to follow pattern made me actually enjoy sewing knit fabric. Just remember to sew slow! I am off to sew a few more for my other dolls and a few friends this holiday season and possibly next!
As with all my posts I would love to hear from you so please leave me a comment here or email me at karenmowen@gmail.com

Monday, December 2, 2013

Create a Holiday Vest For Your Doll With Buttons Galore & More! A Karen Mom of Three Tutorial!

I recently received the most wonderful buttons from Buttons Galore &More and Laura Kelley Designs.
The Holiday Fun! Collection buttons remind me of the holiday pins I used to wear as child and they are the perfect size to decorate doll clothing! I knew I wanted to make something to share with you that you could easily make for your dolls. 
So I thought I would make vest pattern that requires very little sewing and is the perfect beginning hand sewn holiday project. 
To create your own Holiday Vest you will need:
-Print a Vest Pattern
-Tape
-Scissors for paper and felt
-Felt in pattern or solid color
-A needle and thread

Step 1- Print your pattern and cut it out. Tape it together at the X's which form the vest shape. Place on your felt as shown.

Step 2- You can pin your pattern or hold it like I did and use your felt scissors to cut out your pattern shape.
Step 3- Once your felt is cut fold your felt over so that the "right sides" or the pattern side faces inwards.
Step 4- Sew the side seams on each side closed with what ever stitch you are comfortable with. 
Step 5- Turn your vest right side out and choose a button or buttons to keep your vest closed with. 
Step 6- Sew your button on to your vest.

Step 7- To create a button hole, place the side of the felt that doesn't have a button on it, over your button. Use your fingers to pinch the felt back and make a very small snip in the felt with your scissors.
Step 8- Use the button to gently press through the hole, making the perfect button hole as shown in the photo above.

Step 9- Choose a Holiday Fun Button to embellish your vest, I sewed mine onto the vests over the dolls heart but you can also used them to close your vest, decorate your dolls t-shirts, coats and pants! I love crafting with buttons and I know you will love the buttons that you can get from Buttons Galore & More and Laura Kelly!
I hope you enjoyed today's tutorial.
As with all my posts I would love to hear from you so please leave me a comment here or email me at karenmowen@gmail.com