Showing posts with label Darice. Show all posts

Thursday, December 26, 2013

Now That Christmas Is Over Time To Get Ready To "Bling In The New Year!" With Darice's Rhinestone Setter Hot-Fix Applicator! Tutorial and Product Review

Well the coolest new tool in my craft box is the Darice Rhinestone Setter from consumercrafts.com 
This little tool is going to help me "Bling in the New Year" with Today's T-Shirt Craft


To make your own 2014 Blinged out T-Shirt you will need:
-Darice Rhinestone Setter Hot-Fix Applicator from Consumer Crafts. Com
-Hot-Fix Glass Rhinestones 
-Doll T-shirt
-Cardboard
-A Sewing needle
-A Pencil or Pencil crayon
Step 1-  Assemble all your supplies. Select the 5mm tip from your Rhinestone Setter and screw it in to the tip of the applicator. Turn on your Rhinestone Setter and wait 2 minutes for it to heat up.
Step 2- Slide a piece of cardboard into your doll shirt.
Step 3- Use a pencil or pencil crayon to write the year 2014
Step 4- Use the tip of the Rhinestone Setter to pick up one of the hot fix rhinestones. Shiny side up! Press it on to the t shirt where you made the marks. Press into the shirt gently for 5 seconds and pull the setter back, the gem should stay in place. If the gem is stuck use a sewing needle and insert it between the slit in the applicator tip. This should loosen the glue. Repeat with more rhinestones until your "2014" is covered in Rhinestones!
Step 5- Turn off your applicator and let it cool completely before you put it away. Put the shirt on your doll and she will be ready to Bling In the New Year!
I hope you enjoyed today's Tutorial. My review of this product is that it is outstanding! I highly recommend adding this very useful tool to your collection. I know this tool is going to get so much use this year!
As with all my posts I would love to head from you so please leave me a comment here or email me at karenmowen@gmail.com

Wednesday, December 25, 2013

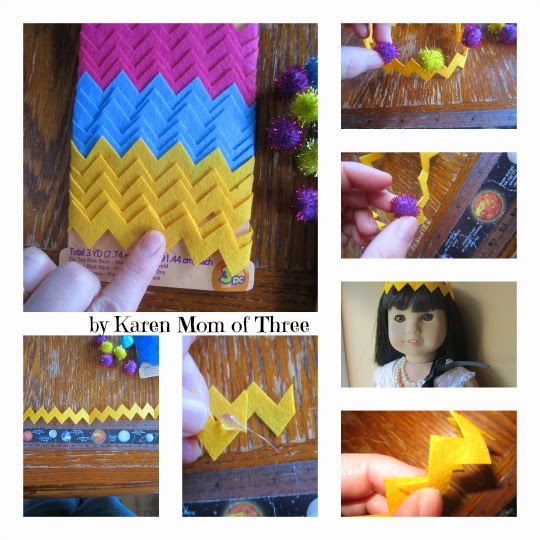
Make Your Own Holiday Crowns For Your Dolls Using Felties Rick Rack and Pom-Poms from Darice!

Well it is Christmas Day and soon the gifts will all be open and the Turkey in the oven. If you have some time to craft today why not make some holiday crowns for your dolls to wear to dinner tonight?
To create your own Holiday Crowns You will need:
-Darice Felties Rick Rack I got mine from consumercrafts.com
-A Ruler
-Pom-Poms
-A Glue Gun and Glue or Glue Dots
-Scissors

Step 1- Unravel 12 inches of felt Rick Rack from your cardboard, make a cut.
Step 2- Add a dab of glue to one short edge and line up your ends over lapping so that there is no overhang on your crown.
Step 3- Add a dab of glue to the points of the top of your crown and attach a pom-pom I used yellow and purple but you can use any color you wish!
Step 4- Let dry and place on your dolls head so she is ready for Christmas Dinner!
I hope you enjoyed your Christmas and that you have enjoyed today's craft! I look forward to sharing more doll crafts with you in the coming days!
As with all my posts I would love to hear from you so please leave me a comment here or email me at karenmowen@gmail.com

Tuesday, December 24, 2013

Make Your Dolls A Cozy Touque & Scarf With Darice Pom-Poms From Consumer Crafts.Com

I know it is Christmas Eve and you are likely pressed for time but if you are like me you may be looking for something to keep the kids occupied until bed time! Why not Get out the Craft box and create this fun Touque & Scarf with your doll lovers this afternoon?
To create your own Cozy Set you will need:

- A Magic Glove (You can use any color, I happened to have in my craft box this Conley white glove it's mate long gone) or you can use a sock.
- A strip of Felt or Polar fleece 20 inches long
-Scissors
- Darice Glue Sticks or Glue Dots from Consumercrafts.com 
-Glue Gun
-Darice Pom-Poms I used Glitter Pom Poms from Consumercrafts.com
-A Piece of String cut to 6 inches or Yarn to tie of the glove fingers or sock top
-Your Doll 
 
Step 1- Assemble all your supplies, and plug in your glue gun if you are using a glue gun instead of glue dots.
Step 2-Gather your glove fingers and tie off and knot the glove as shown in the photo above.
Step 3- Use your Scissors to trim the fingers off the glove or the top of the sock 1-2 inches from your knot.
Step 4- Open your pom poms.
Step 5- Decide where you will place your pom poms and glue into place go all around the bottom of your hat.
Step 6- fold a piece of Felt or Polar Fleece in half so that it measures 10 inches by 2 inches and when folded in length and cut out your scarf (or cut one 20 inch by 2 inch strip).
Step 7- Use your scissors to make a fringe on the bottom of your scarf ends make  1 inch snips along your scarf short ends.
Step 8- Glue pom poms into place along the top edge of your fringe as shown in the photo above. Repeat on the other side.
Make this craft today or tuck it away for your next snow day or sleep over party. This is a fun and easy way to use Darice Pom Pom's! I could  not have created today's craft with out the wonderful people at Darice and Consumercrafts.com . I recommend keeping a well stocked craft box and Consumer Crafts.com make it easy to fill that box! Consumer Crafts. Com really does make creativity affordable!
I hope you enjoy your day!
As with all my posts I would love to hear from you so please leave me a comment here or email me at karenmowen@gmail.com
Monday, December 23, 2013

Create A Holiday Seld For your Mini Dolls! Using Plaid Paint and A Mini Sled From Darice and Consumercrafts.com

Today is Mini Monday and I have a Mini Monday Craft for you. On Consumercrafts.com I found this mini wooden sled that is perfect for the mini dolls!
To create your own you will need:
-A mini doll sled  click here for the listing on consumercrafts.com
-Folk Art by Plaid Paint in Apple Red and Chunky Glitter you can find Plaid Paint by clicking here
-Foam Paint brush
-Paper to cover your work space

Step 1-  Unpack your sled and remove the sticker. Paint the sled with your foam brush in long even strokes.
Step 2- Cover all the edges and underneath. Let it dry.
Step 3- Squeeze some of the Chunky Glitter from the bottle and paint it on to your sled. As it dries it will look like fresh fallen snow! Let dry and give let your dolls enjoy their snow day!

This little sled is the perfect holiday accessory to add to your mini doll play collection and is so much fun to personalize for your dolls!
Keep your eyes out for holiday items you can paint and personalize for your mini dolls!
As with all my posts I would love to hear from you so please leave me a comment here or email me at karenmowen@gmail.com 

Tuesday, December 17, 2013

Embelish Felt Pillow's For Your Dolls This Holiday! A Tutorial by Karen Mom of Three

Today I wanted to share with you the little pillows I made using Coats & Clark Embroidery Thread, Buttons from Button's Galore & More and Felt from Darice  . This is a fun and easy way to practice your stitches and create adorable pillows for your dolls or add a ribbon and make them into tree ornaments.

To create your own little Embellished Felt Pillows You will need:
-Embroidery thread, I used Coats & Clark Embroidery Thread
-Felt Scraps from Darice
-Buttons from Buttons Galore & More
-An Embroidery Needle
-Scissors
-Fiber Fill
Step 1- select your felt pieces to embroider. I grabbed scrap felt from my bag of scraps from Darice
Step 2- Thread your embroidery needle knot the end of one of your strands of thread. Decide the word you would like to sew, I chose "Joy" as it was easy to sew, then "Love" and Peace". If you are unsure where to sew, use a pencil and sketch it on your felt.
Step 3- Knot the last stitch on the back side of your felt. Then repeat on as many felt squares as you wish.
Step 4-Embelish your pillow front with buttons. I used one
Step 5- Select a backing felt for your pillow, I used a piece that was slightly bigger for the back and centered the embroidered piece. I stitched it into place leaving one end open for stuffing, then stuffed the pillow and sewed the end closed and knotted the final stitch on the back side of the pillow. 

If you want to make these as hanging pillow ornaments you can sew on a ribbon to the back of the pillow or keep as holiday throw pillows for your dolls.
Thank you to Coats and Clark, Buttons Galore & More, and Darice for such wonderful products to work with! You can visit any of their sites by clicking on their names or highlighted words in today's post. Be sure to check my Doll Diaries Post out this Friday for the how to on my Coats and Clark Doll Hairband using Phoomph for Fabric! Ruthie loves her new hairband and so do I!
As with all my posts I would love to hear from you so please leave me a comment here or email me at karenmowen@gmail.com