Showing posts with label Coats & Clark. Show all posts

Wednesday, January 8, 2014

How To Make A Beautiful Doll More Beautiful...Sew A Cloche Hat or two...Pattern Reveiw

So today is a rainy rainy day and I set out this morning with my tea and planners to sew today. 
 
Little did I know at 6:30 am that the Cloche Pattern Hat from Eden Ava would be so very easy and profoundly change my thoughts on sewing hats for 18 inch dolls.
As many of you know I work with a bunch of wonderful ladies who belong to Dolls for A Cause , our February cause is Leukemia support and research. Our color scheme is going to be purple so I set out to make my hat to donate to the Auction. I am so very thrilled with how it turned out.  
I want to thank Eden Ava Couture for donating the pattern to be used to make this hat for the auction.
I would also like to thank Coats & Clark for donating the awesome thread I used
I would also like to thank Buttons Galore & More and Laura Kelly Designs for the buttons I used to embellish the hats
The Cloche Hat Pattern from Eden Ava Couture earns the Karen Mom of Three Stamp of Approval. I was able to complete 2 hats in under 1 hour from start to finish and I am thrilled with how easily they came together. If you are looking for a fun hat pattern start with this one.

Click here for Eden Ava Couture's Etsy shop.
As with all my posts I would love to hear from you so please leave me a comment here or email me at karenmowen@gmail.com
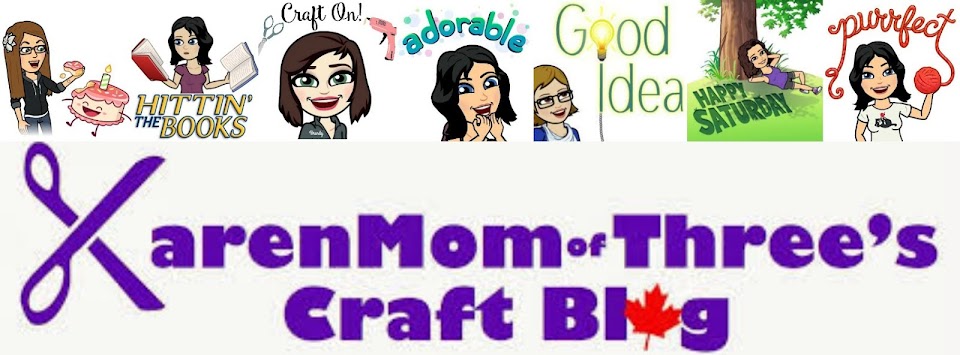
Today I used my American Girl Doll Chrissa and My Dolls House Doll from the UK named Ruby.

Tuesday, December 24, 2013

It's Christmas Eve! My Third Blog Aniversary!


How the time does fly! It is Christmas Eve. How does this happen? Every year it seems we plan and anticipate, scheme and prepare and yet it sneaks up on us year after year. This is such a special time for me, for my family and my blog and I thank each and everyone of you who has followed along this season, read my blog, stumbled on to us on Facebook, Pinterest or Blogger.


Not only is it Christmas Eve but it is also my blog's Third Anniversary. I began this blog Three years ago on a whim. I started this blog at the suggestion of strangers, who would later become treasured friends, that I had met through FB about sharing my doll sewing and craft adventures. I honestly never thought anyone would read it outside my own family. I could never have imagined the way this blog would change my life.


Three years ago a life I could not have imagined for myself began to unfold and each and everyone of you is a part of that journey. I want to thank you for stopping by, for what ever lead you here. Your words, comments and emails have been so encouraging, thoughtful and kind.  It is for each one of you who took the time to let me know you were out there reading and enjoying my work that I continue to write, create and share.


A Special Thank you to Brandy, Madelon, Jessica T for the ideas, crafts and fun finds you have shared with me so that I can share with our readers.  Thank you to Deena of Deena and Beena You tube and Lauren M for your wonderful Dolly Friendship.  Thank you also to Kathryn at Daydream Doll Boutique for giving me another place to share my doll play ideas and crafts.


A Very Special thank you  to Char at Doll Diaries, Anna at Doll it Up and Laura Kelly of Laura Kelly Designs who have included me on the most fantastic and creative teams I could have every dreamed of belonging too.


Thank you to all the wonderful Etsy Shops who have let us have a behind the scenes look at their passion and their work, the pattern designers who give me sneak peeks so that I may share my true opinions of their work with all of you. Thank you to Springfield Collection and Fiber Craft for creating a line of amazing dolls and products that truly helps put doll play in the hands of those who could not previously attain  quality doll play items. Thank you to Canada's Maplelea for including us this year their in their 10 year anniversary and sending me their Set To Celebrate Party Set! 


I would also like to thank the companies of Sculpey Clay, Buttons Galore & More, Rit Dye and Rit StudioCoats & Clark, Red Heart Yarns, Plaid and Folk Art and Laura Kelly Designs for allowing me to share their amazing products with you and helping me to create wonderful doll play items for you, my nieces, my doll swap partners and my family. 
Today I am so very thankful for all of you and hope you will join us for more doll play in the coming days and new year.
If Christmas is a holiday you and your family celebrate then I wish you a Very Merry Christmas and look forward to sharing more with you soon!
As with all my posts I would love to hear from you so please leave me a comment here or email me at karenmowen@gmail.com

Saturday, December 21, 2013

Another FREE Knit Pattern from Coats & Clark and Red Heart!

I think I stumbled onto gold! The Red Heart Floral Knit Doll Accessories Pattern I found by searching on the Coats & Clark Website has given me new hope in achieving my goal of learning to knit Doll hats with this fantastic pattern on the Red Heart Pattern Site!  Best part this pattern is free and marked as easy! I love the beret don't you? Knit along with me by clicking here for the free pattern and email me a photo of your completed project! Even if you just make the shall or parts of this pattern I would love to see what you create! Click here for the Free Pattern , pick up your needles and some Red Heart Yarn and join in the fun!
As with all my posts I would love to hear from you so please leave me a comment here or email me at karenmowen@gmail.com

Friday, December 20, 2013

Knit Your Dolls A Scarf Of Ruffles With Red Heart Boutique Ribbons Yarn In Under 1 Hour!


I have fallen in love with the Red Heart Boutique Ribbon Yarn by Coats and Clark. I knit one from the directions on the back of the label for a friend this holiday season and I knew I wanted to make doll sized pattern! This scarf pattern comes together in under 1 hour and you should be able to make multiple scarfs from one ball of yarn. This is the perfect beginning scarf pattern for dolls.  This scarf can be for fancy doll play occasions or casual, paired with your dolls favorite jean jacket!
I bought my yarn from Walmart here in Canada  for under $6 and they had so many wonderful colors in store even this late in December! You can click here to see the colors offered by Red Heart .
To make your own you will need:
- 1 ball of Red Heart Boutique Ribbons Yarn in the color of your choice.
-A Pair of Knitting needles size 5.5 mm or 9 us
-Scissors
-A Ruler
- Your doll
Step 1- Undo your yarn and separate the ties that hold the ribbon yarn together. 
Step 2- Leave about 3 inches of yarn long then cast on 6 stitches.

Step 3- Knit every row until the ribbon yarn forms ruffles that measure 12 inches.
Step 4- Cast off and knot both ends Trim and put on your doll to wear!

I was amazed at how easily and quickly this scarf came together. I love this yarn and can not wait to knit a rainbow of ribbons with this beautiful product!

As with all my posts I would love to hear from you so please leave me a comment here or email me at karenmowen@gmail.com 


Thursday, December 19, 2013

FREE KNIT PATTERN FROM COATS AND CLARK LOVE MY DOLL SWEATER!

Coats and Clark has a great sweater pattern for our dolls and it's FREE. I love learning to knit and This is a sweater I am just about to start! I picked up Red Heart Shimmer Yarn in pink to give this sweater a go and would love you to join me in knitting! You can down load your free pattern by clicking here. 
I am finishing up my own tutorial for you on a special quick knit for your dolls to share tomorrow and then I am going to start on this sweater. I hope you will join in the fun, Click on over to Coats and Clark's Red Heart Pattern site for the free pattern, pick up your Red Heart Yarn your needles and a cup of tea and join in the fun! Remember to email me a photo of your completed projects!
As with all my posts I would love to hear from you so please leave me a comment here or email me at karenmowen@gmail.com  

Tuesday, December 17, 2013

Embelish Felt Pillow's For Your Dolls This Holiday! A Tutorial by Karen Mom of Three

Today I wanted to share with you the little pillows I made using Coats & Clark Embroidery Thread, Buttons from Button's Galore & More and Felt from Darice  . This is a fun and easy way to practice your stitches and create adorable pillows for your dolls or add a ribbon and make them into tree ornaments.

To create your own little Embellished Felt Pillows You will need:
-Embroidery thread, I used Coats & Clark Embroidery Thread
-Felt Scraps from Darice
-Buttons from Buttons Galore & More
-An Embroidery Needle
-Scissors
-Fiber Fill
Step 1- select your felt pieces to embroider. I grabbed scrap felt from my bag of scraps from Darice
Step 2- Thread your embroidery needle knot the end of one of your strands of thread. Decide the word you would like to sew, I chose "Joy" as it was easy to sew, then "Love" and Peace". If you are unsure where to sew, use a pencil and sketch it on your felt.
Step 3- Knot the last stitch on the back side of your felt. Then repeat on as many felt squares as you wish.
Step 4-Embelish your pillow front with buttons. I used one
Step 5- Select a backing felt for your pillow, I used a piece that was slightly bigger for the back and centered the embroidered piece. I stitched it into place leaving one end open for stuffing, then stuffed the pillow and sewed the end closed and knotted the final stitch on the back side of the pillow. 

If you want to make these as hanging pillow ornaments you can sew on a ribbon to the back of the pillow or keep as holiday throw pillows for your dolls.
Thank you to Coats and Clark, Buttons Galore & More, and Darice for such wonderful products to work with! You can visit any of their sites by clicking on their names or highlighted words in today's post. Be sure to check my Doll Diaries Post out this Friday for the how to on my Coats and Clark Doll Hairband using Phoomph for Fabric! Ruthie loves her new hairband and so do I!
As with all my posts I would love to hear from you so please leave me a comment here or email me at karenmowen@gmail.com
Monday, December 16, 2013

Free Pattern On Coats & Clark for Dolly And Me Crochet

My craft to do list and to learn just gets bigger and bigger! I am loving Coats & Clark's website with FREE Patterns. There is time for you all to get your hooks out and create this Just Like Me doll Shrug for the doll lover in your life this holiday! Click here for the FREE PATTERN
I use Red Heart Yarns in my knitting and I am so looking forward to learning to crochet more then just chaining on in 2014, I really would like to make this for my nieces and their dolls!
Click on over to Coats & Clark to check out their fantastic products and patterns by clicking here.  
Be sure to email me a photo of your completed projects at karenmowen@gmail.com 
As with all my posts I would love to hear from you so please leave me a comment here or email me at karenmowen@gmail.com 

Wednesday, December 11, 2013

Tandem Dye A Diaper Shirt For Your Bitty Baby A Rit Dye Tutorial By Karen Mom of Three

Forgive the shiny light reflection in the photos from today's post. As I was photographing this last night I ran out of light but could not wait to share with you my tutorial for a tandem dye diaper shirt. 
To dye and create a holiday diaper shirt your own Bitty Baby Diaper shirt you will need:
-A 5lb Baby Diaper Shirt I got mine at Sears
-Two Jars
-4 to 6 Cups of Hot Water
-1/2 cup of salt
-A squeeze of liquid dish soap for each jar
-A Plastic Craft Spoon
-Gloves
-Sink to rinse your diaper shirt
-A timer
-A dryer
-A Fabric Remnant Shape (I used a Cupcake)
-Needle and Thread
I called this Tandem Dyeing as I am an impatient crafter and I wanted to have this done before dinner. I started by adding 4 cups of hot water to my large jar and 2 cups to my smaller jar, I added salt, and liquid dye to each jar, I also added a quick squirt of liquid dish soap and stirred the jars separately. I wet the diaper shirt under the tap and then placed the top of the shirt in one jar and the bottom half in the other. I used the spoon to make sure that the shirt was submerged. I left the middle to be plain.
I set my timer for 1 hour and went to work on the embellishment. I used Phoomph for fabric from Coats and Clark, I love this product. It helps give a 3D look to my crafts. I cut out a rough shape of my cupcake from my remnant fabric and then a similar shape from the sheet of Phoomph. I peeled back the backing on one side and lay my fabric on the Phoomph. I then cut out the cupcake shape and the bonus cookie and heart shape too!

I then  found some of my favorite little Laura Kelly buttons and layered them on the Phoomph. Once I had an idea of where I wanted the heart and the cookie shape to go on my cupcake, I thread the needle and sewed the buttons to the heart and then the hear to the cupcake wrapper. I added the star cookie as well.

When the timer went I rinsed the diaper shirt and set it in the dryer. Once dry I attached Cupcake to the diaper shirt. I peeled the back from the other side of the cupcake Phoomph and pressed it into place. I then used my needle and thread and sewed the cupcake into place.
Now our Bitty Baby has a new Holiday Diaper Shirt for when my niece Thea comes to tea on Thursday! I love working with Rit Dye!
I hope you enjoyed today's Tutorial and I look forward to sharing more doll crafts, ideas and fun finds with you soon!
As with all my posts I would love to hear from you so please leave me a comment here or email me at karenmowen@gmail.com